Having a storage unit is a great way to keep things accessible without overcrowding your home. Self-storage units provide additional space to keep out of season items, obstructive sports equipment, antique furniture, cherished collections, and unused décor out of the way. By strategically packing your storage unit, you’ll be able to access your items whenever you need them without having to take everything out. However, if you’re not regularly visiting your self-storage unit and you’ve forgotten what the contents include, you might want to do some housekeeping. This is especially important if you’re planning on redecorating, relocating, or simply downsizing. To help you get started, here’s how to clean out your storage unit in 10 steps.
10 Steps to Cleaning Out Your Storage Unit
You don’t have to be vacating your self-storage unit to clean it out. If you haven’t searched through your things in a while, cleaning out your storage unit can give you a better understanding of what you have, what you no longer need, and what you may want to bring back into your home. Follow these 10 steps for a seamless and organized cleaning process.
1. Review Your Inventory
When you first opened your self-storage unit, you should have created an inventory of items. This doesn’t mean that you have every single item listed out in gruesome detail, but your inventory should provide you with a general idea of what’s inside. Review your inventory so that you get a sense of what’s in each box and what you may want to get rid of or move into your home. We’ll go over specifics regarding decluttering below.

If you didn’t create an inventory, don’t worry. Cleaning out your storage unit will likely take longer, but it gives you an opportunity to create an updated inventory so you can save time and effort in the future. Create a list of everything that’s visible from the entrance to your storage unit including large items and things that are outside of boxes. You may also want to open a few boxes to spark your memory about their contents.
2. Give Yourself Enough Time
Regardless of if you have an inventory or not, give yourself some time for the cleaning process. The amount of time it takes to complete will depend on the contents of your storage unit, but keep in mind that you may be restricted by business hours. If you have 24/7 access to your self-storage unit, you’ll be able to work according to your schedule and won’t need to continually pack and unpack your unit to adhere to operating hours. If you are restricted by hours, consider taking a few boxes home to sort through those on your own time.
3. Make Some Room
Once you’re prepared with your inventory and an adequate window of time, start moving things around in your storage unit to create some room. You’ll want to have a space to process your items without blocking other units or causing too much of a mess. If your unit is outside, consider bringing a fold up table or a tarp so that you can go through your boxes without sitting on the ground. For those that live in a hot or humid city, bring a canopy and a fan to keep cool and protected from the sun. If your unit is inside, carve out a small corner of the self-storage unit so you can keep your items contained.
4. Throw Away Trash
As you’re creating space and getting a better idea of what’s inside your self-storage unit, throw away any visible trash. This could be things that are visibly damaged or actual trash that may have been left over from when you originally moved in. Salvageable items that you don’t want can be put aside, but if they’re old, outdated, or can’t be resold, toss them.

5. Determine What You Will Keep
At the same time, create an area for all of the things that you absolutely know you’ll keep. These things can be replaced into your self-storage unit once you’ve cleaned everything out or they can be taken home and put to use. When you do this right off the bat, you’ll allow yourself for more time to go through the leftover items and make a decision. When you put everything that you want to keep to the side, consider making categories so that you can put them back into your storage unit in an orderly fashion.
6. Leave a Day for Decluttering
After sorting things into your first major “keep” pile, you’ll want to spend some time going through everything else and decluttering. You’ve already filled one box of the three-box method, so now it’s time to consider whether you want to donate or toss the remaining items. This is the most time-consuming step for people, as it requires you to go through all of your items inside all of the boxes. Open every box and evaluate the contents. Take things out and consider whether they’re worth keeping or not. Does an item have sentimental or emotional value? Is it still in good condition? Will you ever use it again? Ask yourself these questions and be honest. While you can easily put them back into storage, skipping this question will leave you with a unit filled with useless items. Take your time and if you’re not sure, keep it and reevaluate the next time you clean out your self-storage unit.
7. Stay Focused
The process of cleaning out a storage unit can come with a ton of distractions. You might come across things you forgot you had, unearth memories from sentimental items, or simply get tired of opening and closing box after box. Try to stay focused. The more efficient you are during the process, the less time it will take. Keeping your storage unit organized is almost as important as keeping your home organized, so if you need help with this step, ask for it. Outside help with organization can encourage you to make more rational decisions during this process and keep you on track to getting the job done. If you’d prefer to do it yourself, start small and work your way through specific areas of your unit. When you try to take on a space too large, you may get overwhelmed and give up.
8. Make Money Off Unwanted Clutter
Once you’ve removed things that you no longer want, consider putting in some effort to make money off of your clutter. You can utilize online sites, social media platforms, or even have a good, old fashion garage sale. There are hundreds of different ways to make money off your clutter and with a little effort, you’d be surprised at what you can get. If you have antique furniture that you no longer want, consider going to a consignment shop or getting it appraised. There is a lot of antique furniture with extremely high resale values, so don’t miss out on lucrative opportunities.

9. Perform a Thorough Deep Clean
Once you’ve gotten things out of the way, thrown away trash, and decluttered your storage unit, it’s time to perform a thorough deep clean. Sweep out your storage unit and transfer items you’re going to keep into new boxes. Use the right containers for storing certain items and create a detailed inventory of each so you know what’s inside in case you need to access something.
10. Reorganize Your Storage Unit
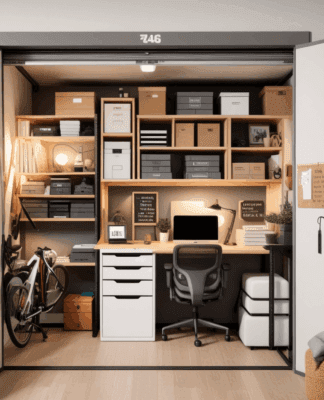
Finally, when it comes time to put your things back into your storage unit, make sure that you’re doing it right. Organize your unit so that things you use the least are at the back and things you may need to access throughout the year are at the front. If possible, create an alley through your unit so you can get to the back without having to take everything out.
Cleaning out your self-storage unit can be hard work. Try enlisting some help from your friends or family during the big day to streamline the process and make things a little more enjoyable. To avoid things with emotional attachments being thrown out, utilize help for the actual clean—after you’ve gone through your items and sorted them into their respective piles. To help you get the most out of your self-storage unit year-round, The Lock Up Self Storage is here. We have a variety of self-storage unit sizes for your needs, all of which are climate-controlled to keep your things in great condition. To learn more about our sizing options, or to schedule a tour of one of our facilities, contact The Lock Up today.

